
In this series, we are building an agentic KYC workflow for high-net-worth onboarding piece by piece.
- The full agentic KYC workflow and architecture
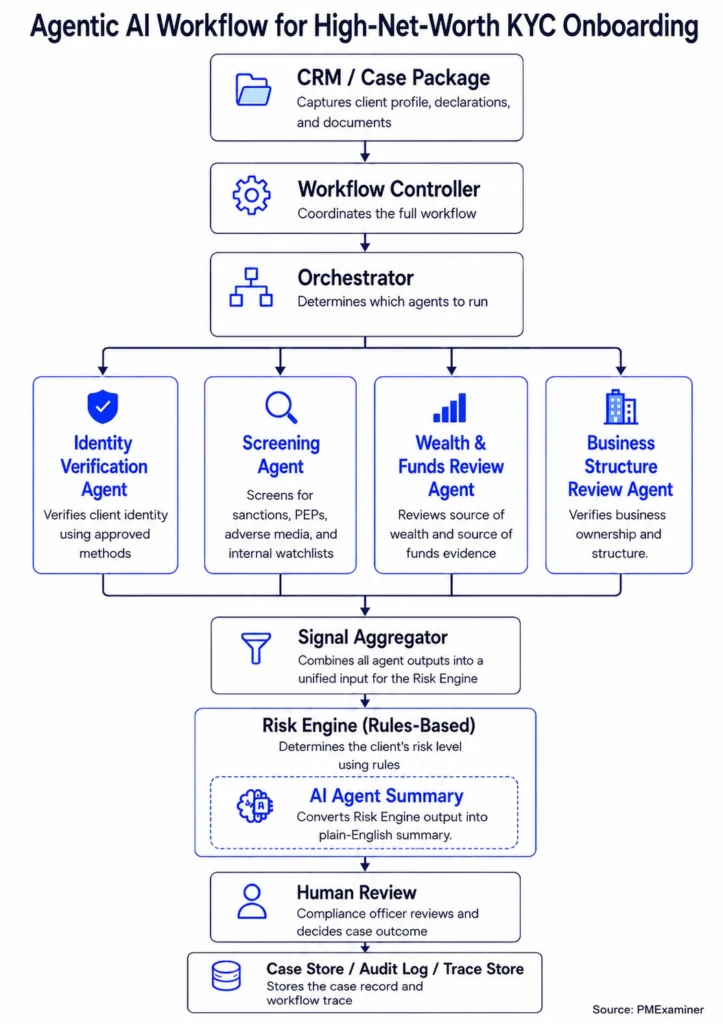
- The CRM and Case Package layer
- The Workflow Controller
- The KYC Orchestrator
- The Identity Verification Agent (this post)
I also built a working prototype in Python to demonstrate this architecture. You can find the link to the prototype here.
Verifying a client’s identity sounds simple.
The client gives the bank a government ID. The bank checks the name, address, and date of birth against the details the client provided.
And that may be enough in some cases.
But identity verification is not always that simple.
The name may be slightly different, or the address may not line up. In more complex cases, the bank may need to check the client’s details against another reliable source.
But before we get into that, let’s start with the basics.
What is identity verification?
Identity verification is the step where the bank confirms that the client is who they say they are.
This is usually one of the first things that happens when someone opens a bank account.
The bank may ask for a government ID, such as a passport or driver’s licence, but a government ID is only one way to verify a client’s identity.
In Canada, FINTRAC describes five methods to verify the identity of a person:
- government-issued photo identification method
- credit file method
- dual-process method
- affiliate or member method
- reliance method
The bank does not use all five verification methods for every client. It chooses the method based on the client’s risk profile and how complex the case is. Let’s look at two examples.
For a client with a simple profile, such as a high-income employee, one government-issued photo ID may be enough. The bank checks the name, address, and date of birth against the ID and moves forward.
For a client like James, the bank may need to verify his identity using more than one source. That is because he has declared possible PEP status, business sale wealth, crypto funds, and expected cross-border transactions. So the bank may use dual-process verification, which checks the client’s identity using two or more reliable sources.
Now, let’s see how the Identity Verification Agent works for James.
The Orchestrator has already decided that James should go through dual-process verification. The Workflow Controller passes that instruction to the Identity Verification Agent. It also sends James’s identity details, document references, proof of address, and consent records.
{
  "agent_name": "identity_verification_agent",

  "method": "DUAL_PROCESS",

  "inputs": {

    "client_identity": {
      "full_name": "James Whitmore",
      "date_of_birth": "1964-04-12",
      "address": "Toronto, Canada"
    },

    "documents": {
      "government_id": "cloud://kyc-documents/KYC-123/government_id.pdf",
      "proof_of_address": "cloud://kyc-documents/KYC-123/proof_of_address.pdf"
    },

    "consent_records": {
      "credit_bureau_consent": true
    }
  }
}
Because the method is dual-process, the agent checks James’s declared identity details against two reliable sources. One source may be a credit bureau check through Equifax or TransUnion. Another may be an identity verification tool, such as Trulioo, Onfido, or Jumio.
The agent then compares those results with the identity details James provided. If there is a mismatch, it returns the issue to the Workflow Controller.
If everything matches, the agent returns a clear output showing the method it used, the sources it checked, and the tools it called. For example, the output may look like this:
{
  "identity_status": "PASS",

  "method_used": "DUAL_PROCESS",

  "sources_checked": [
    "credit_bureau_check",
    "identity_verification_tool"
  ],

  "tools_used": [
    "Equifax or TransUnion",
    "Trulioo"
  ],

  "match_result": "MATCH",

  "summary": "James's government ID was verified, and his name, date of birth, and address matched across two reliable sources."
}
This does not mean the agent verified James on its own. It followed the selected method, checked the approved sources, and returned a finding to the Workflow Controller.
The Workflow Controller records this output and moves the workflow to the next step.
Sometimes, the evidence the agent receives is not enough to complete the identity step.
For example, James may provide one address during onboarding, but the credit bureau check may return a different address. Or the name or date of birth on the government ID may not match the identity details James provided.
When that happens, the agent should return a status such as:
HUMAN_REVIEW_REQUIRED
or
NEEDS_MORE_INFORMATION
The Workflow Controller then pauses the identity step and decides what should happen next.
It may request updated information from the relationship manager or route the issue to a compliance officer.
These conditions must be coded into the Identity Verification Agent. For example, the agent may return an output like this:
{
  "agent_name": "identity_verification_agent",

  "identity_status": "HUMAN_REVIEW_REQUIRED",

  "reason": "Address mismatch between the identity details James provided and the credit bureau result.",

  "review_focus": [
    "Confirm current residential address",
    "Review proof of address"
  ]
}
With these conditions in place, the agent knows when it can complete the identity step and when it needs to return an issue to the Workflow Controller.
That is the role of the Identity Verification Agent.
It follows the method selected by the Orchestrator, checks the client’s identity details against the right sources, and returns a clear identity finding.
For a client with a simple profile, the agent checks a government-issued photo ID. For a client like James, it checks whether his details line up across two reliable sources using the dual-process method.
If the details match across the sources, the agent returns a completed identity finding. If something does not line up, it returns the issue to the workflow for human review.
In the next post, we will look at the Screening Agent and how it checks James’s profile against sanctions lists, possible PEP status, and adverse media sources.